Owing to the screen size of your device, you may obtain a better viewing experience by
rotating your device a quarter-turn (to get the so-called "panorama" screen view).
|
This page updated for 2022.
|
Click here for the site directory.
|
|
Please consider linking to this site!
|
Click here to email us.
|
Melons
(Cucumis melo sp.)
Cultivars
Melons are one of those few crops that cannot be held in a freezer, but we are willing, and even pleased, to accept them as a transient seasonal delight. Corn we want every week, but melons somehow seem especially to be the very spirit of summer (if we actually had the ability to hold melons at peak quality for months at a time we might change our minds, but as it is we’ll accept them as a gift of summer). But while they are available, we’ll gobble them every chance we get.
(Actually, we lied: you can sort of freeze melons, and—they say—retain the flavor; but there are some changes in texture, and the smoothness of fresh melon is one of its attractions.)
There are at least 19 kinds of “melon”; our favorites—and, it seems most Americans’—are what Americans call “cantaloupes” and everyone else calls “muskmelons”: the orange-fleshed melons. Outside America, “cantaloupe” refers to the Charentais-type melon, which—though it looks much like a muskmelon—is in fact a distinct type (Cucumis melo L., var. cantalupensis Naud). Some think Charentais melons are clearly the best in the world, others that they’re good, but no better than many another sort. We think it’s fun to test again every summer.
(Regrettably, many seedsmen, even good ones, do not distinguish Charentais cultivars, and act as if the kind were another variety of muskmelon.)
In our climate—summers short with warm days and cool nights—melons are something of a challenge, though not, thank heavens, an impossible one. While one wants the best possible flavor in a melon, the very first requisite is to have a melon at all. Our search thus focussed on melons widely held to be suited for “northern gardens”, which means early and very early types. But even with that restriction, plus keeping solely, as always, to open-pollinated types (as with so many vegetables these days, hybrids dominate the lists these days), there are not a few apparently excellent candidates.
(A truly excellent resource for those really interested in melons is Amy Goldman’s book Melons for the Passionate Grower, which is to melons as Carolyn Male’s book is to tomatoes—and Carolyn and Amy know one another.)
After reviewing the extensive melon literature, plus reviewing our (limited) prior experiences, we have settled on these three types, all OP (open-pollinated) and orange-fleshed, for continuing trialling (DTM = “Days To Maturity”, reckoned from date of transplanting out):
Charentais 70 DTM, melons c. 2#; French heirloom—Charentais types are considered by many the sweetest of melons.
Delicious 51 73 DTM, melons c. 3#; muskmelon type developed at Cornell University in 1953.
Hale’s Best Jumbo 85 DTM, melons c. 6½", cantelope type, heirloom.
(Because we normally plant our melons as purchased transplants, shortages by our usual suppliers this season obliged us to substitute in a couple of hybrid varieties: Alvaro for the “Charentais”, and Athena for the “Hale’s Best Jumbo”.)
There are certainly many other quite worthy possibilities, but those above seem among the most likely good-eating varieties possible in our climate, and they represent an interesting spectrum of types.
Planting
We need to bring all of our heat-preserving weapons to bear on melons if we are to grow them well, or at all, in this climate—but it can be done. That arsenal needs to include (besides careful cultivar selection) plastic mulches, drip irrigation, row covers, wind protection (notably important for young melon plants), starting seedlings indoors, and careful transplanting out.
(We prefer to order seedlings rather than try our black-thumbed hands at sowing seed, but we include sowing instructions here. All of the types we listed above are normallyavailable as seedlings.)
When planning and planting, remember that your all melons will come ready in a pretty narrow time window, and cannot easily be preserved; even if you like melon every day, be wary of overplanting.
Timing
Melons can take, depending on whom you believe, anything from 60 to over 100 days from transplanting to mature, and they don’t like cool weather: they are said to grow best at air temperatures between 70° and 90°. In our climate, we just don’t (on average!) get over 90°, so the bounds of our 70°-and-up period sets our melon days. We start seeing 70° around early to middle May, and stop seeing it around late September. To cut Mother Nature a little slack, we plant out melons around June 1st; for a nominally 85-day melon (like the Hale’s), that would imply an expected harvest date in late August, when it is still plenty warm. (But never transplant melons while the soil temperature is under 65°.)
Indeed, the length of our 70°-and-up period is (again, on average!) 139 days; that implies that we could even grow significantly longer-DTM types than those we have considered. But till we have a lot more seasons of melon growing under our belts, we’ll stick to the early to mid-season types.
Sources do not agree exactly on how long melon plants should be incubated indoors in pots before transplant, but the lowest figure usually seen is a full month, with some going up to as much as 2 months. On the one hand, the longer we grow them indoors, the bigger the jump we get on the season; on the other hand, melons are finicky about transplanting, and very much do not like having their roots disturbed. Still, if we use good-size peat (or cow) pots—which do not require us to undo the root system to transplant—then 6 or so weeks looks like the right amount of time. Working back from that June 1st transplant date, then, means starting seedlings around April 20th.
(All those dates are approximate: they need to be adjusted for the exact expected growth time of the particular melon cultivars and, of course, for your particular temperature history. Sometimes the melon types will be seeded and transplanted on slightly different dates one from another.)
Starting Seedlings
To grow our seedlings indoors to a healthy size, it would be wise to grow them in at least 3" and probably better 4" pots—either peat pots or cow pots, so you can just plant the pot direct and not disturb the seedlings’ roots. It is also a good idea to slightly overplant—use three seeds per pot—then thin, culling only once the seedlings are big enough to let you know who’s who.
Try to keep the seeds at a high temperature, say 80° to 90° till they germinate (heat pads help here), and in the dark. When the seedlings emerge, lower the temperature to, and then maintain it at, about 75°; to now supply light—16 hours under grow-lights of some sort—is a good idea. Be sure to not let the soil (or peat) dry out—keep it constantly moist. Applying diluted fish emulsion twice a week also helps.
About a week before transplanting, start hardening off the seedlings: reduce both their water and their temperature (somewhat—not drastically!).
The Bed
Your melon bed should have full sun all day long. Melons prefer light, well-drained, sandy loam—they hate “wet feet” or compacted soil. Prepare your melon bed by digging well and deep, incorporating generous amounts of organic material as you go, for melons need rich soil. The pH wants to be a bit lower than the usual 6.8—somewhere between 6.0 and 6.7, but even a little lower will not hurt them (watermelons can tolerate as low as 5.0).
Another thing your melon bed needs is at least some protection from wind, for young melon plants are easily harmed by brisk winds. You might grow a row of some fast-growing stalky plant—grain, for instance—somewhat to the windward of your melon bed, timing the planting to produce good growth by melon-transplant time; or you can construct some sort of mechanical windbreak.
Don’t place a windbreak too close. Maximum benefit occurs at about 5 times the average height of the break; above 10 times, or below 2 times that height, there is little or no protection. Also, a windbreak that allows some air to pass through, like a picket fence (or a stand of grain) works better than a solid barrier of any sort. For a grain barrier, winter wheat varieties, rye, or oats make good breaks—or spring barley for February plantings; sow thickly, 2-3 seeds per inch.
Transplanting Out
About two weeks before you expect to actually set the transplants out, lay down your drip lines, then cover the bed with plastic mulch (or vice-versa, as you prefer). You can use black plastic, the new IRT (Infra-Red Transmitting), or colored plastic—black is usual, but there’s a lot of research going on with newer types. Nowadays the most-recommended plastic mulch for melons is green infra-red transmitting plastic. “Seal” the edges of the plastic by tucking them into the soil (or in any other clever way that occurs to you).
It’s time to transplant, no matter what the calendar says, when your seedlings have two or three true leaves (some say as soon as the second leaf shows). Plant your seedlings out through the usual X-shaped cuts in the mulch. Try to make the cuts as small as possible, and only make them just as you’re transplanting—that way, the mulch will better warm the soil both before and after transplanting. Be sure not to bare or joggle the plants’ root systems when transplanting. They do not like such treatment, and will punish you for it. If you’ve used peat or cow pots for your seedlings, just plant the whole pot. In a deep-dug bed, space plants at about 15 inches. If you are using peat or cow pots, while you can just plant the whole pot, do be sure there is no rim extending above the soil level, because that would act as a wick to draw moisture from the plant; either trim the pot rim down flush with its soil contents or top up the soil to the brim (and slightly bury that brim).
Water your transplants thoroughly to give them a good start in their new home. Immediately after, cover the plants with some sort of row-cover material (spun polyester has been recommended), for both warmth and insect protection.
Growing
Keep a close eye on your young melon plants if the weather is warm: if they are showing signs of overheating (such as wilting), peel back the row cover. You can probably remove it for good, even if the plants haven’t set fruit yet, when daily highs settle down to at least the high 70s.
But if your row cover is still on when the plants first begin to flower—which you should notice if you are watching them as closely as you should—remove it at once so that pollination can take place. Some sources say that it’s a good idea at this time to sprinkle some diatomaceous earth on the plant leaves, to protect the plants from cucumber beetles. (Some also say to spray the leaves with wetable sulphur during late summer, when the nights begin to cool down, to prevent powderly mildew, but many melon plants are awfully sensitive to sulpher; we wouldn’t.)
Melons are not wind-pollinated: they need bees. If you aren’t sure if you have bees, consider hand-pollinating with a fine brush. (Look elsewhere for advice on that topic.)
Watering melons is a distinctly two-stage process. At the outset, in early summer, while they’re into their vegetative-growth phase, they need regular watering—though not to excess— which is why a drip system is so important. (Check the soil: with plastic mulch, the soil should retain moisture well, so don’t waterlog them.) Now: once the first fruit ripens on a plant, cut off its water, completely. Only if the plant looks positively wretched and shrivelling (a condition it shouldn’t get to with that mulch) should you supply any modest further water. Fail in this and the resulting melons will be bland and not sweet at all.
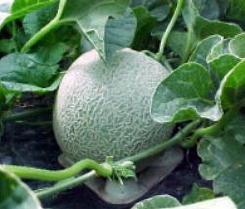
If you mulch with plastic, fine; but if not, look closely at the melon photograph atop this page and you will see a small plastic triangle under the melon—melons should be kept out of direct contact with soil, lest they molder or otherwise get moisture-damaged. Even on plastic, it is wise to keep melons off the surface, so that if it rains they don’t sit in water; things like plastic coffee-can lids work.
Knowing when to pick melons is crucial. Almost half of a melon’s final concentration of sugar occurs in the last week of maturation. During those crucial few days, the fruit passes from immature green to fully ripe. Some kinds are said to deteriorate seriously in eating quality as little as one day past their peak. On the other hand, to achieve the best flavor, sweetness, and size, melons need to stay on the vine till just that magic moment. (Curiously, many melons improve in flavor for about a day or so after
being picked.)
Judging ripeness is not a simple eyeball task. As you get toward the expected ripeness time, check daily and harvest as necessary. Here, from one good source, are a few “techniques serious melon growers use to determine peak ripeness”:
- Be alert to changes in a melon’s skin color as it approaches maturity. The primary color of the fruit will often change from greenish to yellowish.
- In some types, look for a slip, or crack, that will appear where the stem meets the fruit. Some slips encircle the stem partially (a half slip) or completely (a full slip).
- Give a gentle tug. If the melon separates easily from the vine, it’s ready. But not all melon types separate easily when ripe.
- Watch for softening at the blossom end of the fruit.
- Give a sniff. Fragrance is a reliable indicator of ripeness for muskmelons and cantaloupes.
Check on the particular cultivars you may choose to grow to see if they are the sort that separate easily at the ripe stage.
More
Relevant Links
Besides any links presented above on this page, the following ought to be especially helpful.
Odds and Ends
Biology
Although all melons are classified as Cucumis melo, several further botanical subdivisions are recognized. Some of these are:
- C. melo cantaloupensis (true cantaloupes) are not commonly grown in the U.S.A.; they have deeply grooved fruit with a hard, warty or scaly rind, and orange or green flesh.
- C. melo reticulatus are the netted, aromatic muskmelons, and Persian melons.
- C. melo inodorous includes casabas, crenshaws, honeydews, and the late-maturing winter melons.
- C. melo flexuosus is the “snake” melon.
- C. melo conomon is the Oriental pickling melon.
- C. melo agrestis is the “wild melon”.
- C. melo chito is the “orange melon”.
- C. melo momordica is the “snap” melon.
Melons are of the family Cucurbitaceae, which includes their close cousins, cucumbers (in fact, some vegetables grown as “cucumbers” are really melons), as well as squashes of all sorts (including pumpkins), and of course watermelons.
History
We try not to reinvent the wheel: there is already a lengthy and detailed history of melons available on line (though it focusses on muskmelons, the American “cantelope”).
Envoi
All melons are flavorful enough on their own, but you can augment them with a light sprinkle of ginger or salt, or a squirt of lemon or lime juice to enhance the melon’s inherent sweetness.
Return to the top of this page.
If you find this site interesting or useful, please link to it on your site by cutting and pasting this HTML:
The <a href="https://growingtaste.com/"><b>Growing Taste</b></a> Vegetable-Gardening Site
—Site Directory—
Search this site, or the web
-
Background Information
about the purposes and design of this site
- Site Front Page
-
Introduction
- An Apologia: why one should cultivate one's garden
- Deep-Bed Gardening (forthcoming)
- Container Gardening (forthcoming)
- Vegetarian and Organic Considerations (forthcoming)
-
Recommended Crops for a home garden, by variety
-
Gardening information and aids
-
Miscellaneous Information of interest to the home gardener
Since you're growing your own vegetables and fruits, shouldn't you be cooking them in the best way possible?
Visit The Induction Site to find out what that best way is!
|
If you like good-tasting food, perhaps you are interested in good-tasting wines as well?
Visit That Useful Wine Site for advice and recommendations for both novices and experts.
|

|
This site is one of The Owlcroft Company family of web sites. Please click on the link (or the owl)
to see a menu of our other diverse user-friendly, helpful sites.
|
|
 Like all our sites, this one is hosted at the highly regarded Pair Networks,
whom we strongly recommend. We invite you to click on the Pair link for more information on getting your site or sites hosted on a first-class service.
Like all our sites, this one is hosted at the highly regarded Pair Networks,
whom we strongly recommend. We invite you to click on the Pair link for more information on getting your site or sites hosted on a first-class service.
|
|
All Owlcroft systems run on Ubuntu Linux and we heartily recommend it to everyone—click on the link for more information.
|
Click here to send us email.
Because we believe in inter-operability, we have taken the trouble to assure that
this web page is 100% compliant with the World Wide Web Consortium's
XHTML Protocol v1.0 (Transitional).
You can click on the logo below to test this page!
You loaded this page on
Friday, 19 April 2024, at 03:52 EDT.
It was last modified on Wednesday, 26 January 2022, at 03:04 EST.
All content copyright ©1999 - 2024 by
The Owlcroft Company